Friday, August 25, 2006

iPod 5G Themes List v1.1.1 (Screens included)

This is a list (in progress) of all themes for the 5G. If i find a theme that isn't using the most recent update I convert it to 1.1.1 using the converter. Then I make screens of the Now Playing and Charging screens for all of the themes. Finally they are uploaded here. All credit for these themes go to their original creators/porters. The name of the creator is in the zip file name (ex: "creator - theme name.rar"). If someone edits/ports another person's theme credit will be given to both people (ex: "creator - theme name (editor/porter).rar" ). Also, the screens may not look exactly like the original creator's work because of fonts they may have included in their theme. If a theme has a font with it i'll leave the font in the zip with anything else the creator added, i'll only update the pics in the theme, everything else is left untouched.

If you want to comment about a specific theme in this list you can search the forum using the title of the theme and comment in the original post.

-------------------------------------

-------------------------------------

Admins: Thank you for stickying it!

v1.1.1 Themes

Jabdo79 - Honeycake Blue.rar


grumpytreto - Final Fantasy x2.zip


grumpytreto - Looney Tunes.zip


grumpytreto - Nightmare Before Christmas.zip


grumpytreto - Simpsons.zip


grumpytreto - World Industries.zip


Isuka - Marble Sky.zip


Dustin - Firefox.zip


Mike101 - MSN 8.0 Beta.zip


Svoms - Basic Black & Red.zip


Svoms - Black & Red.zip

Windows Users - Get photos on your contacts

Some have said that only Mac users can get photos attached to their contacts on the 5G's. I found a way to do this with a Windows iPod. If you don't already have it, download and install Palm Desktop. It's the software that comes with Palm Pilots, and is free to download.

http://www.palm.com/us/software/desktop/

Create a contact in Palm Desktop and add a photo. (FYI, I've found that photos that are cropped to about 96 x 96 work well. Square is best.) Then, you can highlight your contact that has the photo attached and select "Export vCard" from the File menu. Navigate to the contacts folder on your iPod, and drop it in there. This should make it come up on your iPod the next time you check your contacts.

Hope this works well for you.

5G Video iPod Tutorial: Menu Icons and Pics

TO GET ICONZ (courtesy of Etho and richardsj)

1)Download and intall Ipod Wizard Version 1.1 Beta from http://www.ipodwizard.net/wiki/index.php/Main_Page (then remember to get the new iPod.ini by searching the forums, it enables use with the new firmware)

2)GET the 2005-11-17 Updater (if you don't already have it, you need this updater, no other updater will work with this)NOTE: APPLY ICONS ONLY TO A COMPLETELY UNMODIFIED UPDATER, GET the 2006-01-10 Updater (for the new icons patch located in the next step, also apply to UNMODIFIED UPDATER)

3)Get The Icons Patch (courtesy of etho), 5G iPod Video Icons (for the 2005-11-17 updater), NEW 5G VIDEO ICONS(for the 2006-01-10 Updater) (courtesy of richardsj)

4)Apply the patch then open iPod Wizard (I reccommend backing up the modified files)

5)Load your iPod Firmware (13.6.0) using the pull-down menu, then click the "WRITE" button on the top in the middle.

6)The top bar should say "Writing Firmware, Please Wait"

7)Then a pop-up should come saying that the firmware was written successfully

8)Click "Downgrade Firmware" button under Ipod Wizard Essentials (located at the top right corner)

9)A pop-up should say that the firmware was successfully downgraded and a bunch of numbers saying before and after should be under the message.

10)Open the 2005-11-17 Updater or 2006-01-10 Updater (depending if you chose the new icons or not), the update button should be clickable, click the update button (DO NOT CLICK RESTORE (only if you wish to)) on the iPod Updater Screen.

11)Wait for the iPod to finish updating

12)Your iPod should restart with iconz

NOTE: You will NOT lose any of your music, videos, pictures, or anything else during this process (unless you click restore)

TO Change Pictures

1)Open iPOD Wizard

2)Load Firmware v13.6.0 or 5th Generation iPod

3)Click on the Firmware Editor tab (may already be open), then go to pictures tab

4)The first picture should be a bar, THE TOP LINE SHOULD READ;
Index: 0 Width: 320 Height: 18 Bit Depth: 16 Type: 1

5)Lets try to change the "DO NOT DISCONNECT" picture that comes up when the iPod is plugged into the computer

6)GO TO Index: 324, this should display the red icon that always comes up (DO NOT DISCONNECT BUTTON)

7)Download a theme from iPod Wizard , I will use the new Cool Mixed Black&Blue theme:

CLICK HERE to download that theme

8)Save the file to the disk

9)Locate the file and open it, it should be named "Black and Blue.zip"

10)Then open the next folder named "final custom" (be patient)

11)The folder will open with 328 pictures in it, they should read, for example "pic001.bmp"

12)Since we want to change index 324 (the Do Not Disconnect button) go to picture 324 named "pic324.bmp"

13)open the picture (the skeleton with wrench logo should be displayed) and save it to a place where you will remember

14)Go back to iPod Wizard and click on Index: 324 again (if you are not already there), the picture should still be the same

15)Look on the right side of the screen and locate the "Load Bitmap" button, click on it

16)Find where you saved your skeleton logo picture, open that picture

17)iPod Wizard should now display the "index: 324" picture as the skeleton Logo

18)Click the "Write" button on the top and wait a little

19)Then choose "Downgrade Firmware" in the top right hand corner, click on that

20)After that is finished, go to the iPod Updater and
open it

21)Click on the Update button

22)Your iPod Video should restart with the skeleton Logo as the Do Not Disconnect Picture
REMEMBER: This can be done with any picture using any theme file, but remember the picture you replace it with must follow the pixel width and height that are listed, FOR EXAMPLE for the Do Not Disconnect Picture the pixels must be 100 width and 100 height.

23)Go to here to download other themes for the iPod Video:
LINK #1 5G Video iPod Themes
LINK #2 Ultimate Theme List

If you are having trouble with any of this, please post in this thread or pm me.

Sunday, August 20, 2006

Triple-boot IPL and Rockbox Tutorial

Rockbox Instalation guide
iPodLinux

-1. Connect your iPod. Make sure that if you have IPL installed, then delete it. If not, then don’t install it yet.
-2. Install Rockbox
-3. When Rockbox is finshed installing, DON’T DISCONECT FROM COMPUTER!!!
-4. Install iPodLinux
-5. Make sure that you have the nesiscary files like the operating system for Rockbox and Podzilla. I highly sudgest Floydzilla. It works great and is very nice and organized.
-6. Disconect iPod
-7. Try IPL then reset and try Rockbox. If you folowed the steps correctly, it should work. To boot into the regular firmwear, hold the menu button.

Goodluck and enjoy ! :d

Thursday, August 17, 2006

iPod Nano Linux installation tutoral

Step 1.
Download this utility
(credit goes to Daniel Naggy for this handy partitioning tool).
Unzip the exe file to a easy to type path, and remember the path, once extracted rename the file to an easier name such as aes (i will use this name every time I'm refering to this tool in the tutorial).

Step 2. Prepare the necesary files:

-Download this ipl installer (it's just the 4G with updated kernel and podzilla builds).
-podzilla and start files(use the files from the zip file above).
-Apple Updater.
-HP's USB format thingy (optional) (optional)

Step 3. If your ipod holds important information, backup the ipod, this procedure will definately erase all data in the ipod.

Step 4. Kill ipodservice.exe process. (hit Ctrl + Alt + Delete, then click processer the find ipodservice, then click end processer)

Step 5.If your tried to install ipodlinux without success I would recomend you format the ipod using hp's tool, use ipod updater right after to restore normal apple firmawe and allow the ipod booting the apple firmware (do nothing after the updater is done, it should start automatically), after apple's firmware has started restart the ipod (menu + select) and enter diskmode (select + play while booting).

Step 6.Install ipodlinux, select apple firmware start and right after finishing the install, eject the ipod and start it in disk mode.

Step 7.Open a command prompt window and goto to the folder with the aes.exe file, from there type:

aes ? /info (where ? is a number starting from 1)

type this command changing the number until you find the ipod, the 4G ipod shows the following message:

aes 5 /info
EBIOS characteristics (C/H/S): 497/255/63
Total capacity: 3GB

As you can see my ipod is disk number 5, the 2GB ipod should show a similar message but displaying 1GB in capacity, the following commands are based on the fact that my ipod is disk number five please replace this number with the number of your ipod.

aes 5 /show

Should output something like this:
---------------- Hard disk 5
Primary partitions:
No ID Type Dr Label Size (MB) Boot
══ ══ ═════════════════ ══ ══════════════════════ ═════════ ════
1: 00 Empty 0
2: 0B FAT32 0 **
3: 83 Ext2/Ext3/Reiser 31
4: 00 Empty 0

aes 5 /delete:2
aes 5 /pri:3851:fat32
aes 5 /activate:1

Note: if you have the 2GB ipod you should use aes 5 /pri:1866:fat32

Now eject the ipod and start disk mode while it's booting.

Windows still won't recognize the ipod, but now it will promt you to format it, let's format the ipod, select fat32 and quick format, restart and go to disk mode after format is completed.

After the ipod has been formated the ipod won't boot(no linux, no apple), but the apple updater will recognize the ipod without major problems.


Step 8.Restore the ipod, and after restore is complete (meaning you booted from apple's firmaware at least once), restart the ipod and go to disk mode.

Install linux again after its installed, eject the ipod and go to disk mode,
copy podzilla and start files, eject, restart and boot linux (rewind).
Linux should boot fine and Windows should now recognize the ipod normally.


Note:If you experience anomalies while using the ipod under windows, just format the ipod, using just windows, not the hp tool or the ipod updater.
Good Luck.

if you need help just post nd i will deffinitly help asap
(credit is due ~ tequilaguru from the ipodlinux forums made this amazing tut)( but i fixed a little bit of the confuzing parts)

if you fail nd eather formater doesnt work Use this method

and for the video uncompression use this tutoriall

Yahoo Photos out of beta

Yahoo is taking its new photo site out of beta for U.S. customers. The new Yahoo Photos site, which was launched in a limited beta in June, allows people to download high-resolution photos, tag shots with descriptors for easy search and comment on other peoples' images. Yahoo Photos also features integration with Yahoo Mail, Messenger, Mobile and 360. The new service will also be made available to AT&T Yahoo High Speed Internet subscribers.

Wednesday, August 16, 2006

Step by step tutorial of converting DVD/Video to iPod supported files

Toturial of converting different kind of video to both iPod and cellphone supported format(mp4, 3gp, mp3)

1. Download Moyea 3GP PSP iPod Video Converter by the following link http://www.nunufashion.com/software/...ideo_setup.exe, install and run it.

2. Choose the output file format that you want to convert by clicking the file three button. (mp4, 3gp, mp3)


3. Click the "+ icon" to open the video files that you want to convert.


4. Select the video file that you want to convert, and click setting button to set the start position and end position of the video. Also you can adjust the contrast and brightness of the video, while you preview it.


5. Click the browse button to set the path that you want to the output files locate.


6. Click the drop down list to choose the default profile for you cellphone / iPod video. And you also can create/edit new video profile according to the media specification which your device(cellphone, ipod, psp) supported.


7. Click go button to run the converting. The process bar will show the percent of the converting operation. After the convertion finishes, the software will open the output path automatically to let you check the new converted video file.


OK, now you can download the elegant tool to have a try by yourself. You'll enjoy playing with it.

Ipod nano background image tutorial

Tools Needed:
· iPodWizard
· I used iPod Updater version 2005-10-12 but it should work with other versions
· Adobe Photoshop or equal
Specs:
· Can only be greyscale.
· Max height of image is 60px and width is 140px, split into four segments each being 15px in height.
· Can only occupy Photos, Extras, Settings and Shuffle songs.

Step 1- Using IpodWizard save the bitmap for font index 29.
Step 2- Decide on the picture you want and load it into photoshop; then change it to Greyscale with the size of 140x60.
Step 3- Create a new layer from the Fbitmap background with Ctrl+J.
Step 4- Using the magic wand select the white behind the text on the new layer and delete it; now all you should have on the new layer is the letters. With the backround set to non-visable u will see a grid background.
Step 5- Cut the image into four sections each being 140x15.


Step 6- Now drag each segment onto the Fbitmap and put it behind the text layer. To make it easier I lined each part up with the second to last letter so they would be centered.
Step 7- Once all the pieces are in place save it as a .bmp.
Step 8- Open up iPodWizard and load your saved bitmap as font index 29.
Step 9- Downgrade firmware and write.
Step 10- Using your iPod as reference adjust the sections so that they line up.

iPod Nano Theme Tut. Using Direct-Editing

1. Plug your iPod in
2. Open up iPod Wizard
3. Click the scroll menu at the top and go to ipod.
4. Click "Load iPod Firmware"
5. Wait
6. Go to the pictures part and click Load all, Find the folder the theme is in and click OK.
7. Wait for the pics to load
8. Then click the "Write" button near the top, Wait for it to download to your iPod.
9. Go to My Computer, Right click on youre iPod and click Eject.
10. Your done in 10 EZ Steps

If you are having troubles after this. You proably need help.

Ultimate iPod Charger Tutorial

Why is it the ultimate? it holds your iPod (first to do this), it charges it, all the cells can be charged at the same time (havent seen that yet have you?), and it uses an iPod serial plug! now, here comes some heavy stuff... yes you can mess up your iPod doing this, although it would be incredibly difficult. please ask lots of questions, if you dont understand something, DONT DO IT. do not hesitate to ask, im easy to talk to. First, im going to talk about making a basic charger, the rechargable aspect of it will come in the second part, dont stress that yet.
Supplies: Soldering iron and solder, iTips iPod connector from radio shack (i havent looked for it elsewhere, there is probably a better price out there), two (2) 3 cell AAA holders, one (1) two cell AAA holder (my charger makes 9.6 volts, if you want to make 12 volts, buy TWO of these 2 cell holders), double stick tape, spare packing foam, container to put it all in, heat shrink tubing/electrical tape.
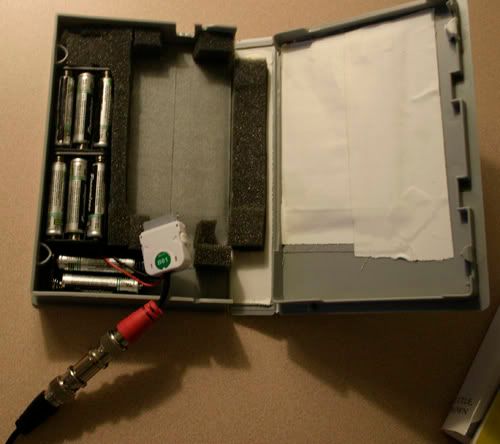
For containers, you could use a beta tape a normal VHS container, a random box or case... be creative! now, i made mine to fit and protect my iPod, if you dont want to do this, get a smaller container (just big enough for the batteries) and dont worry about getting foam.

This is just about the simplest wiring you will ever do, but requires some modification to the iTips plug, and some soldering. if you are worried about your abilities, i would recommend asking for help.

Take your battery holders, and wire them in series. this means, take the positive (+) from one, and attach it to the negative (-) of the next. put them in a chain like this, so you are left with a positive on one end, and a negative on the other. this combines the voltage of all the batteries we have together, 8 rechargable AAAs, each with 1.2 volts, making 9.6 volts. if you opt to use the second 2 cell holder, 10 AAAs, that is 12 volts. dont worry, the iPod can take anywhere up to 16 volts VERY safely, so dont worry about that. make sure to cover these attaching points with something! i used heat shrink tubing because its nice and neat, but electrical tape works fine too. here is a paint pic of the holders wired together in series. you can see that they are going to the iTips plug, i will explain that part in much greater detail, just understand the BASIC concept!

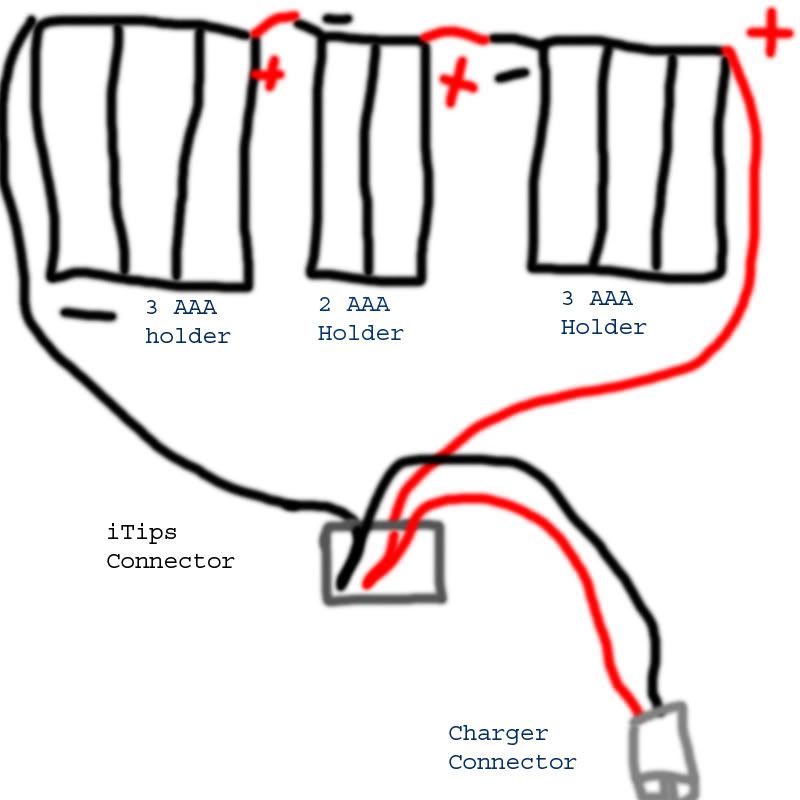
notice how they are in a chain? with a positive on one end and a negative on the other? very good!

heres a pictures of the wiring of my buddies (mine looks a little different, which will be explained in part 2)

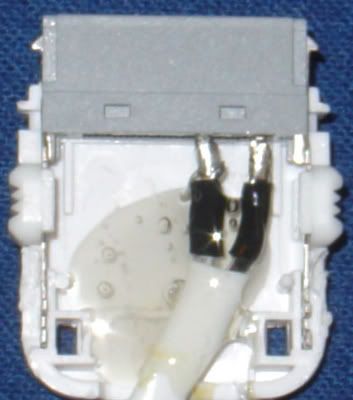
notice how its soldered right to the pins? the wire is also held down with some hot glue so it wont snap off the pins... good idea, but mine is much cooler. i took the stock piece that filled the hole originally (shown here)

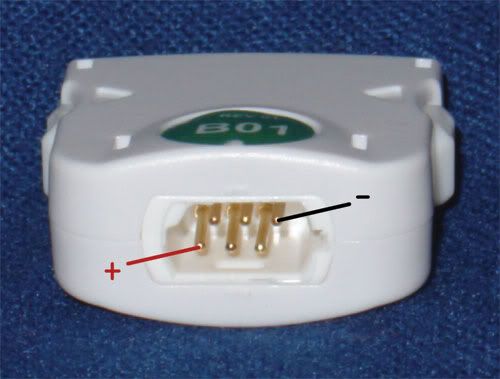
and snapped out all the little pins. then i drilled a hole in it, and ran my wires through there. i used a zip tie inside the unit to hold the wires snugly in place. it looks totally stock, with the white bracket and everything... very trick! snap together the iTips case, and you are preeeetty much done.

now all you need are some AAAs, and you are on your way. the same concept works for rechargable AAs (they are higher capacity, therefore longer battery life! but they weigh a lot more, and cost more... not worth it to me) I would however not recomend using rechargable 9vs with this concept, they are good voltage, but horrible capacity... and very expensive. target sells these AAAs for pretty cheap... cant even remember, i got mine ages ago (use them in my mini Z rc car )

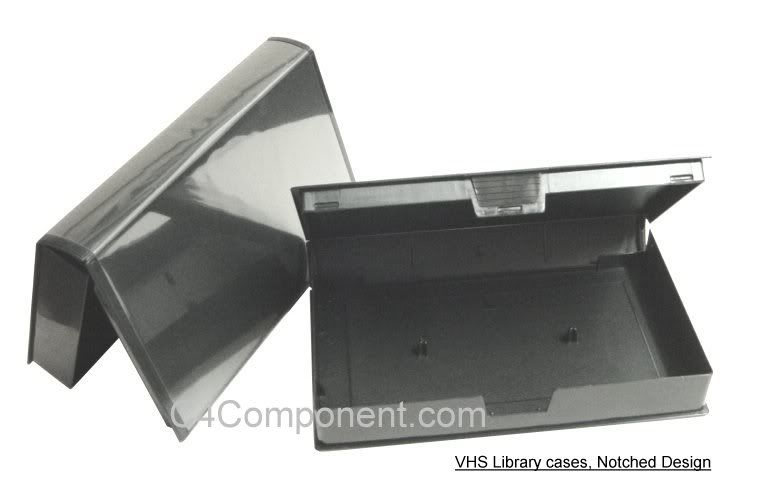
to make the actual case, i took an empty betamax tape case, and pimped it out! here is a shot of an empty VHS case pulled off google, same idea, expect mines a little smaller, and the cooler factor is ENDLESS

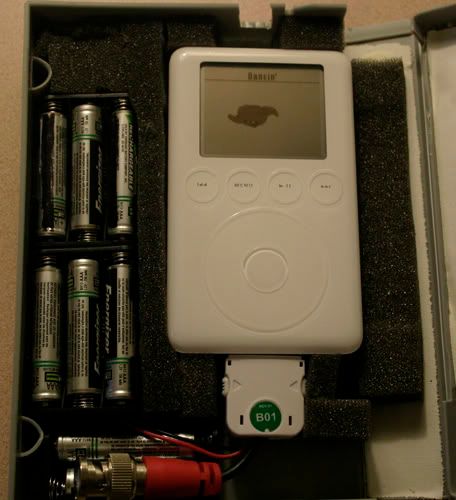
all i did was take old packing foam, and glue it to the inside of the case, creating a snug area for the iPod to go into. i used standard elmers WOOD glue, i swear its the best thing for foam out there. for the front and back of the ipod, i taped thing soft padding wrap (also used in shipping) inside the case. when this thing is closed up, and shook, the iPod doesnt move a drop... its amazing. i used an xacto knife to cut a notch for the headphone cord, use the double stick tape to hold down the battery holders, and ta-da. this is an area where you kinda got to get creative. i suggest you go crazy, and get original. im totally willing to answer questions, but its hard to describe... its pretty easy once you visualize it.

part 2 on its way right now... just a lot more complicated so it needs some explaining

now, to make the whole unit rechargable...at the same time. its a really convinient feature, because most rechargable battery chargers only do 4 or 2 AAAs at the same time, and if you do two batches, one then has to sit around, it takes a really long time, and they might not get even voltage and capacity… bad. While the last part might have been a cake walk, this is much more difficult… please read carefully.
Supplies: soldering iron and solder, heat shrink or electrical tape, old 12v dc transformer (explained), molex/2 pin connector (explained)

Ok, so the way I designed it is using an old transformer. You know your cell phone chargers, or the power supplies for other devices use those black boxes that plug into wall sockets. Like one of these!

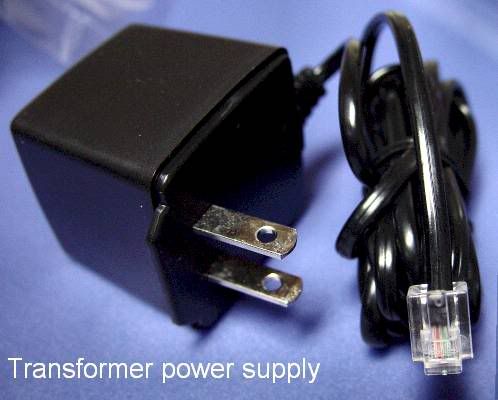
The black boxy part normally has a sticker on it, telling you the input voltage (120v AC) and the output voltage. For the output voltage, we want 12v DC. I used a 9v DC one initially, and it worked fine, but charged kinda slow. Now, where could I get one of these? Like I said before, old cell phone chargers, adapters and transformers for stuff that doesn’t work/got thrown out…. Look around! The easiest kind to use is the ones with the wires separated into two easily recognizable wires. Cut off the tip on the end of the cord, leaving two wires, positive and negative. Normally one wire is marked with a white stripe (on the outer plastic casing), this is commonly the negative, but I suggest whipping out a voltage meter and checking this! They aren’t all marked, and guessing is completely the worse idea ever. Please don’t blow up your iPod.

You need a way to attach and detach this charger to your batteries, I suggest using a Tamiya connector, 2 pin molex connector, or any other shielded connector with positive, negative, and a male/female system. I suggest something like tamiya connectors, make for RC car batteries, notice they each have positive/negative, and there is a male and female connector

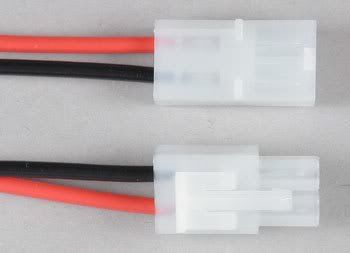
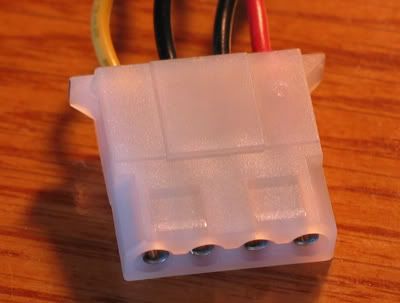
They are made so you CANT incorrectly hook them up, really nice. Radio shack sells molex connectors, coming in anything from 2-30+ pin spaces. It is a sytem for making custom connectors and cables. Here is a shot of a 4 pin molex, commonly seen in computers, and for sale at radio shack, and similar component stores.

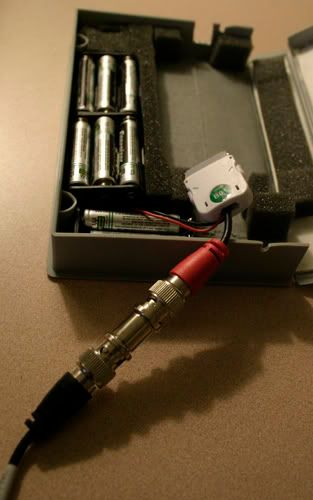
I however used a standard barrel style cable… like video cable, cable. I wouldn’t recommend this for amateurs, but once again… get creative! Any male/female connector would work, use your head

If you use a 2 pin connector (molex, or tamiya for example) simply take the positive end of the wire, and solder it to the positive end of the charger wire, and same for the negative. Then solder the positive of the OTHER half of the connector to the positive inside the iTip connector, and the negative to the negative. This way the charger wire is touching the positive and negative end of the battery wires, so the voltage will charge those.

Note how the positive and negative from the batteries, and charger cable are coming out of the iTip connector? Pretty simple concept, and its shown in the wiring diagram. now you can peak all the batteries at the same time, just charge them until they get warm to the touch. if you have a voltage meter you can monitor their voltage as they charge... but this is misleading! although their hypothetical peak voltage is 9.6, they will get up closer to 12-13 volts when peaked (charge until they are warm to the touch), but that voltage will quickly disapate, and they will settle around 9.6 volts. so dont worry about that.

in THEORY you could charge the batteries, and the iPod at the same with, with that wall charger, but i havent done that yet, and dont know how well it would work. i would need to test the iTip under load, and thats pretty difficult to do.

ok, so i know this is confusing, and im sure im missing crap, but its 3:46am, i got classes tomorrow, so... just ask about the areas you dont understand (and dont say the whole thing)

now, here are some referance links
mini altoid charger

normal iPod charger

detailed instructions for altoids charger (including wiring!)

another creative firewire charger

bandaid box charger (runs using a car charger adapter, check it out)

dont want to make you own charger, but REALLY cheap... check this out

more referance shots (some are from the collage, but bigger = more helpful)


Eight great iPod hacks, mods and tricks

The iPod is a deeply personal device. The music, contacts, calendars and notes you store on it reveal much about your personality. From playcounts to playlists, our iPods can tell others what we enjoy, how we think and even who we are. But if you truly want to transform your iPod into an engine of extreme personal expression, why not customize it?

Hacking an iPod—whether it’s modding the case, installing custom software, or tearing it up and doubling the memory—can transform the ubiquitous music and media player into something unique. Once again, Playlist has scoured to net to find the hottest iPod hacks, mods and customizations. As always, you should be aware that trying any of these tricks carries the risk of ruining your device. We present these for the curious, but urge you to exercise caution before even considering any of them. Keep in mind that if you crack open your iPod and destroy it in the process, Apple isn’t going to take pity on you. In other words, don’t try this at home.

1. Penguin Power

We went over this customization in our last look at iPod hacks, but we’re featuring it again as iPod Linux is the essential hack, table stakes for many of the other hacks you might want to try. It’s fully supports iPods in generations 1-3, and has been successfully installed on all others with a display—which doesn’t necessarily indicate that you’ll be successful yourself. You should also grab a copy of Podzilla, which will add a graphical interface to iPod Linux. There are multiple flavors of Podzilla available for you to choose from. Once installed, iPod Linux and Podzilla will let you boot up your iPod to a bare-bones Linux mode. Furthermore, it will serve as the foundation for many other hacks, both ones listed here and those in our previous guide.

2. Knowledge to Go

Everyone loves Wikipedia. It’s the free user-built encyclopedia with entries on more topics than Britannica. It’s a great information resource, but what if you’re away from your desk? Now you can get it on your iPod and carry Wikipedia with you everywhere you go. Unfortunately, it’s not yet available for all models of iPods, nano and video users are left out for now. (And obviously, since there is no display on the iPod shuffle, there is no point to installing Wikipedia.) You first will need to install iPod Linux.

3. Double your Damage

One of the two most daring iPod hacks we’ve come across was this build featured on multiarcade. Not content with the 4GB of memory iPod nano? So why not double it. Not for the faint of heart, performing this hack requires that you conduct some major surgery on your nano. First you’ll need to buy a broken nano from eBay. Next up, crack it open and remove the memory. Then, and here’s where it gets really dicey, you’re going to want to open up your working nano. Finally, you’ll solder the memory chip from the broken nano to the empty pad in the working one, seal it back up, and perform a factory reset. You’ll now either have one working nano with 7.2 GB of space, or two useless ones. Either way, this courageous hack should make for a fun-filled weekend project.

4. Mobile Movies

If you have a lot of movies on DVD, odds are you’ve thought of transferring them to your iPod. Doing so is relatively easy using free software available for both the Mac and Windows. Be warned: unless you use an analog capture method, the DMCA makes it illegal for you to take the movies you own on DVD and put them on your iPod.

For Mac (and Linux) users, the process couldn’t be easier. All you need is a copy of the free utility Handbrake. Handbrake is already available as a Universal binary—good news for those who have a new Mac Book Pro, Mac mini, or iMac—and can rip video from DVD directly to mpeg-4 video, the format you’ll need to watch it on your iPod.

Windows users need to make a few extra steps. First, you’ll need to find a DVD ripping program, such as DVDFab Decrypter or DVD Decrypter. Next, you’ll want to convert your video to AVI using a decoding tool. Finally, it’s time to convert that AVI file into mpeg-4 video that can play on your iPod, Videora iPod Converter is a great tool for this last step.

5. iPod to TV on the Cheap

This hack is almost the reverse of the previous one, at least in terms of what it accomplishes. Want to watch content from your iPod on your TV? You can easily do so by purchasing the $19 iPod AV cable from Apple. But where’s the fun in that? Apple notes that other AV cables are not compatible with iPods with color displays. But that’s not completely true. You can accomplish the same task using a standard mini-jack to three-plug RCA cable. Since these cables tend to run southwards of ten bucks, it makes for a slightly cheaper way watch your iPod videos on your TV set. Set your iPod to output to TV, plug in the cable via the minijack, and you’re nearly there. The final step is to simply plug the RCA connections into your TV using a non-standard setup. Apple outputs the iPod’s video to the red cable—rather than the traditional yellow. So you’ll want to plug the red cable into the video (yellow) plug on your TV, the yellow cable into the white plug, and the white cable into the red plug. This is an easy hack that anyone with an iPod video can try.

6. Pac Attack

Growing up, I spent endless hours in front of an arcade console, popping pills and running from ghosts. Now I can re-live those glory days with my iPod, thanks to iPodMAME, which allows me to play Pac-Man right on my iPod. This hack will install a version of MAME, the arcade game emulator program, on your iPod. As with the Wikipedia hack, iPodMAME requires that you first install iPodLinux. The program comes with romsets (the set of files including all the game data) including one for Pac-Man, however others should be able to be added. To date, iPodMAME has only been tested on the 5G iPod with video and the iPod nano, but the creator notes that it should work on any iPod with a color screen.

7. Radio Free Shuffle

As always, Jim Younkin’s Shufflehacks site is a great source of inspiration. And one of the recent hacks he posted was no exception. This risk-free hack will let you turn your iPod shuffle into a portable radio station—perfect for taking your shuffle with you on a road trip. The build notes offer instructions on how to build a radio transmitter that plugs into your shuffle (or other MP3 player). The example on Shufflehacks uses a computer mouse for a body to house the radio, perfect for an über-geeky customization.

8. Scratchless Super Screen

There are only two complaints we hear about the iPod with any degree of regularity. The first is that the screens can be easily scratched, and the second is that they’re all the same. This hack takes care of both of those complaints. Note that we include this last mod not because we think you should try it (we don’t!), but rather because it’s so daring. Like the memory doubling hack featured above, this is a good way to ruin your iPod. But that didn’t stop Seth Fogie from cracking open his iPod and scratch-proofing the display. Noting that the faceplate on the Sony PSP is more bulletproof than that on the iPod, and that it nearly matched the iPod’s in terms of size, Fogie set about swapping the two of them out. Fogie completely disassembled his iPod, and then filed down his PSP faceplate to fit. After re-assembling everything, he was left with a “Scratchproof” iPod. While we don’t suggest you try this at home, we’d love to hear about it if you do.


TubeSock v1.0 Released

Everybody loves YouTube, the place on the net where all manner of curious and intriguing videos can be found. I can spend hours cruising videos around that site. If you're like me in that regard, you may want to have a look at Stinkbot's TubeSock v1.0 for Mac OS X v10.3.9 or higher.

TubeSock grabs YouTube videos from the web and copies them to your video iPod, Mac, or PlayStation Portable. TubeSock knows how to convert the video using the codecs and bitrates best for each device. It can even add the video to iTunes for you. What's more, if you don't have a video-capable iPod, TubeSock can rip just the audio portion of a video and send it to your iPod, mini, or nano. Good stuff!

This is a Universal application, ready to run on both PowerPC and Intel-based Macs.

Seagate Announces 120GB 1.8" (iPod-sized) Hard Disk

As reported by PC Exposure, Segate has announced a 120GB 1.8" hard drive, the same phyiscal size as that used in the hard disk-based iPods. There is speculation that Apple will use this drive in an upcoming iPod. This new 120GB drive represents twice the storage capacity of the largest hard drive used in a current iPod.

Will the upcoming, rumored "Video iPod" make use of this new drive? Stay tuned....

10 tips to be photo smart

The digital camera has achieved the same status as the cell phone, laptop computer and the Internet. For the real estate agent doing business today, owning a digital camera, knowing how to use it and dealing with digital photos on the computer is an absolute necessity. Still most agents take average pictures, haven't read the manual for advanced options and struggle with where the pictures go and how to find them after they are on the computer.

To help jumpstart your digital camera skills, I've put together my top 10 tips and tricks for success in using your digital camera more effectively, more productively and more profitably. If you have told yourself, "It's too complicated!" or "I know what I need to know!" or "I don't have the time to learn!" just ..

1. 1-Step or 2-Step . Know Your Shutter. To many, this may seem as simple as the answer to "Who's in Grants tomb?" Yet it still amazes me how many agents don't know this critical user tip. Bad pictures will result if you treat a 2-step shutter camera like a 1-step shutter camera. Some background. One-step shutter cameras, referred to as "point and click" cameras, generally have a fixed focus lens and only require one single continuous movement down and the camera will take the picture. Most digital cameras today are a 2-step shutter. While composing your picture, pushing the shutter down approximately half way and stopping is the first step. The camera will then make any exposure or focus changes. Normally a green light in the viewfinder will signal that it's ok to take the picture. Complete the pressing of the shutter downward until the picture is snapped. Here's where a great picture can turn out be a bad picture. On a 2-step shutter camera, if you press the shutter down in one single movement (like on a point and shoot camera), the camera won't have time to adjust the exposure setting and the focus will probably be off. If you have a 2-step shutter on your camera, learn what that "half way down" point feels like and sounds like (usually makes a clicking or gear movement sound).
2. Try a New Angle .While composing your pictures, inside and out, look at the prospective picture from standing and then from 3-4 feet off the floor (or ground). When experimenting with this composition angle in my hands-on digital camera seminars, most agents react with a "Wow, this is really neat! I love it!" Now you can't use this angle on all of your shots, but some rooms and exterior shots take on a whole new look and feel from this lower perspective. This is a great way to showcase kids rooms, at their own level. Or, take a complete set of pictures from "adult" standing level and a complete set of pictures just for "kids". If bending down or getting on your knees if difficult, buy a "monopod", a collapsible walking stick with a camera mount on the top (look at www.dcprodirect.com) Try it, you'll like it!
3. To Flash or Not To Flash, That is The Question! .The internal flash on most digital cameras reach out only 8-12 feet compared to 30-35 feet with traditional 35mm cameras. Pictures taken of longer rooms with the digital flash set to Auto or on (forced) sometimes result in the back part of the room darker than the front. Try turning the flash off. If the picture is more even but still dark, read the next tip. Depending on the time of day, another tip is to "force" the flash, sometimes referred to as "fill" flash. Even though there is enough light without the flash, forcing the flash will produce a "different" look. Does it make for a better picture? I don't know! It's a personal preference. Try it next time you're taking home pictures. It never hurts to take one picture with and one without the flash. When you view them on your computer you'll know which one you like better.
4. Still Too Dark? Change the ISO Setting. So you turned the flash off, the lighting is in better balance, but it's just too dark. A quick change to a higher ISO may solve the problem. Basically a higher ISO setting gives you a better picture in "low light". If your camera allows for changing the ISO setting, the "automatic" setting will usually do the trick. But when it doesn't, knowing how to change the ISO can result in a picture you don't have to go back to the computer and "fix", saving you some valuable time. Next time you have a "low lighting" setting, change the ISO to 400 (or the highest setting allowed).
5. Still Difficult Lighting Conditions? Try Changing the White Balance! It's a long, narrow family room with lots of recessed, fluorescent lights. You turn the flash off for more even lighting front to back, but the resulting picture has a "yellow" cast and is not acceptable. A simple menu choice can make an incredible difference. When a flash is used, it corrects for the difference in color produced by different types of lighting. When the flash is not powerful enough to light the entire room and you turn it off, the resulting color balance will depend on the type of lights in the picture. If your camera supports modifying the white balance, common settings include: sun, shade, tungsten, fluorescent and maybe incandescent. Not sure what is the best setting? Try them all. It only takes a few seconds to change the setting and take a picture to see the results. When you need it, this simple setting change will give you an excellent picture.
6. Take Personal Pictures of Sellers or Buyers, But Know These Words .. If you have attended a digital camera seminar of mine or read past articles, I advise taking impromptu, personal pictures of your sellers, their kids & dogs or even buyers (during showings). Then print a yearly calendar (various templates available) with that "special" picture in the middle. Try printing on canvas paper and it should guarantee a placement on the hallowed "fridge door" in your customer or clients kitchen. The "heavenly" picture of the kids could end up looking like blurry, little red-eyed "devils" if you don't use the "red eye" flash option and my simple technique. To correct for red-eye, change your flash setting on your camera to the red eye setting. Most cameras have this option and tapping a menu button a few times is all that is needed. When you depress the shutter to take a picture, the flash will pulse several times to condition the retina of the subjects eyes, with the actual picture snapped on the last flash pulse. So here's the tip. Just before you take the picture say, "Now when I take the picture, there will be several flashes, so hold that beautiful smile until I say done.Hold it . Hold it.Grrrrreat". You'll have less movement and no red "devil eye". It works every time. (Try the HP Real Estate Marketing Assistant software for several calendar templates.)
7. Resize on the Camera or Resize on the Computer? Most agents now understand the relationship between the quality of the digital picture and the resulting size of the digital file. Sending a digital picture by email, putting on a web site or needing high quality 8x10 printouts all require different file sizes. There are times you will change the resolution on the camera for the specific purpose of the picture or you can take all your digital pictures at a high(er) resolution and make lower resolution copies after they are transferred to your computer. Most digital editing software offers the option to resize and rename your image. If you have Windows XP on your computer, a free utility from Microsoft even allows you to resize and rename groups of pictures at one time. If are not sure about what settings your camera offers and the resulting file size, your manual should offer a chart showing different resolution settings and the associated file size.
8. For Resizing Groups of Pictures, Get PowerToys for XP. By now most computers have current versions of Windows XP. The Windows XP operating system offers many new features for working with digital files, some built-in and some you can add for free. If you have Windows XP, go to http://www.microsoft.com/windowsxp/home/ downloads/powertoys.asp . Download the Image Sizer utility. This PowerToy enables you to resize one or many image files with a right-click. To use this Toy, select any image, or group of images, right-click, and select Resize Pictures. The Resize Pictures dialog will appear, giving you options to resize the images at 640x480 (Small), 800x600 (Medium), 1024x768 (Large) or 240x320 (Handheld PC-sized, for Windows Pocket PC and other handheld devices). When you resize the images, new versions are created with slightly different filenames. For example, if you resize an image called AndersonHouse.jpg to handheld-sized, it will be renamed AndersonHouse (WinCE).jpg. Resized to Medium, this image would be called AndersonHouse (Medium).jpg. There is also an Advanced button you can use to enable more options. This includes a choice to make images smaller during conversion, but not larger (often a good idea), and one that will replace the original rather than make a copy.
9. You Need a Wide Angle Lens . for inside and outside shots. Check your manual for the specs on your camera. It should list the 35mm equivalency of lens. A moderate wide angle lens is 35mm (35mm equivalency). A true wide-angle lens (with no distortion) is 28mm (35mm equivalency). Most digital cameras manufactured today have a 38mm as the widest lens setting. If your camera zoom lens starts at 38mm, check with www.dcprodirect.com. They offer adapters and wide-angle lenses for many camera models.
10. You Can't Win the Lottery if You Don't Play .i.e. - if you don't carry your digital camera with you at all times, you can't take pictures. Every time you leave the office, make it a point to carry your camera and extra batteries with you. You never know when you will need to take pictures. If you are looking for a new camera, take into consideration the size that would allow you to slip it into your pocket, briefcase or purse.
Take the time to learn the advanced options available on your digital camera and they will help you take better pictures. Changing a few camera settings can make a world of difference in the quality of your pictures.

Ajaxitagging

emy Keith has written about his experience taking tagging to the web 2.0 extreme, incorporating Ajax via Hijax, rel-tag, del.icio.us API, x-folk entries, and more:

Each journal entry page now shows the tags at the end of the post. These are linked (using rel-tag of course) to an aggregate tag page that shows any other posts with the same tag. Pretty standard stuff.

But then I thought it would be fun to tie the post in with other things I’ve tagged, not on this site but on Del.icio.us. Under the heading “Related”, you’ll find links to the same tags for my del.icio.us links.

Rather then sending you off to Del.icio.us, I’m using the Del.icio.us API to bring the results back to this site. Using a bit of Ajax, these results are displayed without a page refresh. I’m using Hijax so if JavaScript is disabled, the links will still work.

I’ve got a nice little progress bar going while the request is being sent, and a bit of a colour fade happening when the response comes back. The results themselves could probably do with some more styling. Right now I’m just displaying them in a regular unordered list of x-folk entries but I think they might look nice if they were more comment-like in appearance.

Script.aculo.us 1.6.2 Released

Thomas Fuchs and co. have released script.aculo.us 1.6.2.

This is mainly a bugfix “go ahead and grab it” release:

  • Fix a problem in the drag and drop logic if an reverting/drag ending draggable was initialized for a new drag (for example by clicking repeatedly) for all cases where the default start/revert/end-effects are used, fixes #4706 [thx tecM0]
  • Fix possible memory leaks with Draggables, fixes #3436 [thx aal]
  • Throw nicer errors when requires script.aculo.us libraries are not loaded, fixes #5339
  • Make slider handles work when not displayed initially by using CSS width/height, fixes #4011 [thx foysavas]
  • Update sortable functional test with onUpdate counter
  • Make more Element extensions unit tests work on Safari
  • Add the assertMatch unit test assertion for asserts with RegExps [thx Ian Tyndall]
  • Fix a problem with Effect.Move causing “jumping” elements because of very low float numbers in some situations
  • Fix a missing semicolon in dragdrop.js, fixes #5569 [thx mackalicious]
  • Fix a slight inaccuracy with Effect.Scale that could lead the scaling to be one pixel off
  • Be more prototypish with Effect.Transitions.linear
  • Make Effect.Scale recognize font sizes that use the pt unit, fixes #4136 [thx aljoscha]
  • Fix IE hack in Effect.Opacity, fixes #5444 [thx nicholas]
  • Fix IFRAME layout fix for IE and Autocompleter, fixes #5192 [thx tommy skaue]
  • Fix only option in onEmptyHover, fiex #5348 [thx glenn nilsson]
  • Fix Effect.BlindDown and SwitchOff handling of supplied callbacks, fixes #5089 [thx martinstrom]
  • Fix a problem with field focus on Ajax.InPlaceEditor and loading external text, fixes #4988, #5244 [thx rob]
  • Do not attempt to scroll if scrollspeed is 0/0, fixes #5035 [thx tomg]
  • Fix a problem with Sortable Tree serialization, fixes #4939, #4688, #4767 [thx Sammi Williams]
  • Fix an endless loop with sliders, fixes #3226, #4051, #4765 [thx jeff]
  • Make autocompleter work with update DIVs that have scrollbars, fixes #4782 [thx Tommy Skaue]
  • Corrected options parsing on switchoff effect, fixes #4710 [thx haldini]

Sharman Subsidiary Sues StreamCast

Sharman Networks said Tuesday that its Altnet division had sued StreamCast Networks, creator of the Morpheus peer-to-peer client and network, claiming the company infringed on three separate patents related to efficiently operating a P2P network. The suit was filed in federal court in California.

The fight between the two companies goes all the way back to 2002, when Sharman-owned Kazaa locked users of the Morpheus client out of its network. From there the relationship between the two networks soured, leading to Tuesday's legal action against StreamCast.

According to the suit, StreamCast allegedly is infringing on the so called "TrueNames" patents, which form the basis of Altnet's capability to sell licensed content. StreamCast and its CEO Michael Weiss are named as defendants in the suit.

"StreamCast have been given ample opportunity by all to mend their ways. Their determination to continue distributing infringing material has left us with no choice but to prosecute them," Altnet manager of enforcement programs Michael Speck said in a statement.

Altnet says it issued warnings to StreamCast twice earlier this year that it was about to file legal action, which the company ignored. Approximately 144 million copies of Morpheus software has been distributed, and StreamCast is already facing charges of copyright infringement in the same court.

"StreamCast's brazen patent piracy underpins its massive copyright infringement business," Speck said. "They are simply running out of opportunities to go legal." The suit asks for unspecified damages and an injunction that would prevent StreamCast from distributing software that infringes on Altnet's patents.

Speck's charges of copyright infringement seem rather hollow, however, especially in light of his company's own actions. Sharman Networks recently settled with the record industry on charges it willfully committed copyright infringement through its Kazaa P2P service.

StreamCast had not responded to requests for comment as of press time.

Google Buys Photo Recognition Firm

Google on Tuesday announced it had acquired Neven Vision, a company that develops photo recognition software which is currently used in mobile phones, along with biometric applications by the U.S. government and law enforcement.

Neven Vision holds 15 patents related to image analysis and facial recognition. Google plans to use the technology to improve Picasa, its free photo organization application. The program will eventually be able to automatically identify individuals and places in pictures, which will make searching far easier.

"It could be as simple as detecting whether or not a photo contains a person, or, one day, as complex as recognizing people, places, and objects. This technology just may make it a lot easier for you to organize and find the photos you care about," explained Picasa product manager Adrian Graham.

Startup Riya is building its business around similar photo recognition functionality, enabling users to upload and sort their pictures by who and what is in them. The also recently rolled out a new search tool for scouring the Internet by color, sketch or similar image.

Google did not say what it plans to do with Neven Vision's products that are currently in development, including iScout, which allows camera phone owners to snap a picture and search for information relevant to the content in the photo. Neven Vision also provides facial recognition scanners to government agencies.

"Neven Vision comes to Google with deep technology and expertise around automatically extracting information from a photo," added Graham. "We don't have any specific features to show off today, but we're looking forward to having more to share with you soon."

Apple Fights Use of 'Pod' by Others

Apple is attempting to protect it trademarks by sending out cease-and-desist orders to companies using names for their products that are similar to its iconic iPod. The letters were sent to at least two companies, Profit Pod and TightPod, Silicon.com reports.

Profit Pod makes a device that compiles data from vending machines, while TightPod is a manufacturer for laptop covers. According to a copy of a letter obtained by the technology site, Apple asserts that the names are too similar to its iPod, among other reasons.

In the Profit Pod's case, Apple alleges the device looks too similar to the iPod. "It has not gone unnoticed that, like Apple's iPod device, the Profit Pod product is a small, flat, round-cornered rectangular device with a display screen," the letter reads.

Both the manufacturer of Profit Pod, Mach5Products, as well as TightPod, has gone as far as to request a trademark on the names. In letters to both companies, Apple asks the company to abandon this process.

According to Apple's complaint, TightPod was also preparing to make covers for MP3 players that would have been marketed under the same name.

Apple was not publicly commenting on the situation.

Memorex Begins Selling HD DVD Discs

Optical media maker Memorex announced Tuesday it had begun shipping its HD DVD-R discs to retail locations across the United States. Utilizing a blue-violet laser, the discs can store 15GB of data, or up to 75 minutes of HD-quality video and 7 hours of standard DVD video.

It won't be cheap to be an early adopter of the technology, however, as each HD DVD-R disc will cost $19.99 USD. Like it did with standard DVDs, that price will go down as the marketplace begins to adopt the high-definition format. Memorex previously began selling Blu-ray recordable and re-writeable discs in June. 25GB write-once Blu-ray media retails for around $25 USD per disc.

Real to plug Windows media support into Linux

SAN FRANCISCO–RealNetworks will release open-source software this year that will let Linux computers play Windows Media files.

The media delivery software company and Novell made the announcement at the LinuxWorld Conference and Expo here. Novell said it will include the tool in its Suse Linux Enterprise Desktop 10 in the fourth quarter.

Currently, Linux users can play Windows Media Video (WMV) and Windows Media Audio (WMA) content if they install closed-source modules, said Jeff Duchmann, general manager of client and digital rights management technologies at RealNetworks. That will change as the result of a licensing deal RealNetworks has signed with Microsoft and its settlement of an antitrust suit against the software giant. It will release open-source code to play the files as part of the Helix Community project it launched to bring RealNetworks technology to Linux.

"The work we’re doing will all go into the Helix client," Duchmann said in an interview here. However, the software won’t support digital rights management available with Windows, he added.

RealNetworks also is evaluating adding support for the AAC compression format, an audio compression format used by Apple Computer’s iTunes and others, he said, though that would require further licensing actions for the company. "If we’re going to do music services on other platforms, like Linux, we’re going to have to support it," he said.

Duchmann added that RealNetworks also hopes to bring its music store technology to Linux.

Expanding application support is a key part of making Linux viable on desktop computers. It’s a goal many companies have chased, largely unsuccessfully, for years. Novell is the largest company currently working on the idea, employing a catch-phrase of spreading Linux "from the desktop to the data center."

"We have for the first time a real alternative to the Windows desktop. Linux and open source are there," Novell Chief Technology Officer Jeffrey Jaffe said at a news conference. In particular, there’s a big chance for companies to make their case as customers evaluate Microsoft’s new Vista version of Windows.

"Over the next six months, there is an opportunity for the IT organizations to do a significant pilot–to find several hundred users who are knowledge workers and let them as a pilot try out our desktop," Jaffe said.

Tuesday, August 15, 2006

Introducing LaCo (or AJAX for the non-programmer)

From “The Spotty Blog” today, we learn about a new Ajax toolkit that allows developers to add Ajax functionality “without getting their hands dirty” with the actual code - LaCo - Late Content.

They demonstrate four different kinds of usage:

  • Automatic - giving sections of the site a src in a laco_src attribute
  • User-activeated - a laco_target attribute in the link fires off the action
  • User-ativated with a toggle - the same, but with the option to hide as well
  • On Mouse Over - activated on hover with laco_target and laco_toggle attributes

All that’s required to use this library is to include prototype and the laco.js files into your page. You can grab the download here and try it out.

50 AJAX Reference Websites From Around the World

As a consistent devotee of the AJAX scene over the past year or so I have hundreds of feeds in my reader. Recently, I've had several email requests from readers requesting to know what AJAX websites I visit daily. While I visit any title that interest me, these are the sites I go to consistently.

Since the coining of the the term AJAX over a year ago hundreds if not thousands of websites, blogs and forums have been buzzing with posts on the subject. As I've found this can sometimes leave search engines bewildered as to where the current and relevant information really exists. So I thought I would put together this list of what I think are some of the most relevant AJAX sites are worldwide.

Please consider this list of AJAX reference sites to be in its infancy. I don't read as many languages as I'd like to so the current list is rather limited by language. Please feel free to add to this list by adding a comment to this post with other useful AJAX resource sites. If you think the idea of a moderated AJAX website resource list is a good idea let me know and I'll set up a wiki.

Special thanks to all of the hard working developers who are spending their free time share their knowledge with all of us!

English
Ajaxian
Simply one of the best AJAX sites on the web. Daily updates, insightful commentary and coverage of Ajax development around the world.

AJAX Blog
Daily AJAX content with sreenshots and commentary.

AJAX Camp
Ajax Camp is a community for learning, interacting, and asking questions about web-based development using Javascript and Ajax.

AjaxForums
Very active forums focusing on AJAX

AJAX Freaks
This website exists to provide you with information to use while learning or developing AJAX. If you need AJAX Help or you would like to provide AJAX Help to other developers, you are in the right place.

AJAX Geek
All things ajax, css, dhtml, xml, javascript, and geekier

AJAX Goals
AJAX site with forums, code samples, news and articles

AJAX Guru
AJAX blog by Kishore

AJAX Impact
Very nice AJAX Community with great references

AjaxLessons
AjaxLessons.com is a resource for ajax tutorials as well as information surrounding Ajax and web 2.0.

AJAX Line
AJAX Community with a blog, forum and tutorials

Ajaxlinks
AJAX links, code samples and news

AJAX Magazine
AJAX blog focusing on new AJAX developments.

AJAXMatters
Ajax Matters is an informational site about AJAX (short for "Advanced Javascripting and XML" or "Asynchronous JavaScripting and XML") and how these technologies are applied to web development. Simply put, I started Ajax Matters to collect and share information about the XMLHTTPRequest object, JavaScript and XML.

AJAX Patterns
The publicly editable repository of all things Ajax. Design Patterns, Frameworks, Libraries, Tools and Links

AJAX Projects
AJAX Projects categorized by programming language

AJAX Review
AJAX and web 2.0 dissected. The purpose of this site is simple. Take nifty web-tools, analyze them, post screenshots, and help people find useful (and not so useful) web applications

AJAX Talk
Discuss the new web

Ajax Technology Forums
Asynchronous JavaScript And XML Ajax forums, discussions and tech issues.

Ajax Tutorial
Ajax help for newbies

AJAXwith
AJAX resources and information

AJAX World
AJAX discussion group with over a thousand members!

Aspects of AJAX
AJAX blog with loads of resources

Coding In Paradise
Excellent and thoughtful AJAX tutorials and techniques by Brad Neuberg

Cyber Dummy
AJAX code samples and source code

Fiftyfoureleven
Fiftyfoureleven.com consists of a weblog and resources that focus on web development: designing, programming, copywriting and more.

Jep's Rich User Interfaces blog
About AJAX Performance and some other things by Jep Castelein of Backbase

Logicalley
AJAX blog by Chris van de Steeg author of LiveGrid

Mozilla Developer Center
Great site to get a first look at AJAX.

Panasonic Youth
AJAX blog by Rob Sanheim with a focus on AJAX and Java

Protolize
Protolize is a place where we share most commonly used and helpful tools out there that we like to use as a web designer + developer.

Rob Gonda
Great AJAX Coldfusion content with commentary

Software As She’s Developed
AJAX, java, patterns, usability by Michael Mahemoff

There and Back Again
The weblog of Joshua Eichorn, AJAX, PHP and Open Source

Tony Yoo
I've been getting many requests from people asking for this page where they can access different resources that are not included in Protolize.org website. So I've decided to keep this page up for those people.

Web 2.0 Technologies
Blog with resources for AJAX, javaScript and rails

Italian
On Ajax
Italian blog covering AJAX developments

Open AJAX
Italian AJAX community site with forums, demos and articles

Sastroup
Italian language site with resources for AJAX, javascript and PHP.

German
Ajax Aspekte
German language AJAX blog with loads of resources

AJAX Community
German language site devoted to AJAX and web 2.0 developments.

Ajax Info
German language blog focusing on AJAX and web 2.0.

Ajax Scripting
A nice German language ajax blog.

Alvit - The Web Developers Handbook
A German website written in English full of web dev resources. There is a nice section on AJAX, DOM and css

Mathertel
German blog presented in English with some nice AJAX references and projects by Matthias Hertel

Japanese
Ajax Blog
Japanese Ajax presented in English (Asynchronous JavaScript + XML) blog by Yukio Andoh.

Atmarkit
Japanese language AJAX site providing code samples and source code

Hatena
Japanese site presented in English with AJAX resources

Korean

OK JSP
Korean language site coving AJAX, JSP and XML

Spanish
Ingeniuz
Spanish language site with a useful AJAX section

Monday, August 14, 2006

Windows Live Writer

Today Microsoft released a beta of a free blog writing program, Windows Live Writer. It appears to be similar in features to w.blogger and ecto, but without Parallels still, I cannot test it tonight. The one thing that WLW touts is the ability to add new categories to Wordpress blogs, something that I have not found in other blog writing programs. In any case, Microsoft did open up an SDK for the program so maybe this will be a win for Microsoft in the Web 2.0 word.

One other thing that intrigues me with this is the possibility of using it as a support model for University departmental web sites. Instead of tinkering with licenses for Macromedia Contribute, the University might be able to use this and some sort of content management software for departments to keep up their site. Who knows, but in any case it is an interesting development for blogs tonight.

Zabbix - a free monitoring tool

Zabbix is (free of cost) software that monitors numerous parameters of a network and the servers on that network. Zabbix is a useful tool for monitoring the health and integrity of servers. A flexible notification mechanism allows users to configure e-mail based alerts for virtually any event, allowing fast reaction to server problems. All monitored parameters are stored in a database. Zabbix offers excellent reporting and data visualisation features based on the stored data, making Zabbix useful for capacity planning. Zabbix supports both polling and trapping. All Zabbix reports and statistics, as well as configuration parameters, are accessed through a web-based frontend. The web-based front end means that the health of your servers can be assessed from any location.Properly configured, Zabbix can play an important role in monitoring IT infrastructure for companies with even hundreds of servers to monitor.

This guide contains all the necessary information for installing and understanding the architectural layout of the implementation. It was written with the assumption that you understand how to use Webmin and have a basic understanding of Linux Mandrake. This includes installing Linux Mandrake and RPM packages, editing files, making directories, compiling software and understanding general Unix commands. This guide doesn’t explain how to use or configure Zabbix, but information on where to obtain this information can be found in the "Additional information" section.

Read more here

Sunday, August 13, 2006

Gigasize.com - Unlimited files

At GigaSize.com you can upload and share unlimited files of up to 1 GB for free without any registration.

If you register for a FREE account you can upload and share unlimited files of up to 1.5 GB, and you have access to an advanced file managerthat makes it easy to organize files.

GigaSize.com is the easiest way to upload and share unlimited images, mp3s and videos with friends and family.

The greatest thing about GigaSize.com is that the more you upload and the more your friends download the more you get rewarded with GigaPoints. GigaPoints are virtual credits that can be used to upgrade to a premium account with enhanced features and files that are up to 2.5 GB in size.

Google Ranking Tips

Google is by far the most popular search engine available today for both ordinary surfers and webmasters alike. Surfers like it because of the highly relevant results it gives and the speed at which it delivers them. This is due to its complex text matching algorithm and of course the Pagerank™ system that this engine uses. More on the Pagerank™ system later. Google is popular with webmasters and Internet marketing companies due to the highly workable ranking system it uses.

Unlike other engines where information about how the results are obtained are sketchy at best, Google actually publishes information on its site about the results it produces. Hence webmasters have things they can do to produce higher rankings.

What also makes Google popular with webmasters is the speed at which they will spider and list your site. If you're not listed in Google and submit your URL you're usually indexed within two weeks. If however your site is already listed in the index Google should reindex once every month, but more frequently if you've a high Pagerank™.

This indexing and reindexing time is much quicker than most other search engines. This allows webmasters to edit their pages properties such as title, first few lines of text, headings, keyword distribution and of course the number of incoming links to their site. They can then discover quickly if the changes they made were successful or not. It's because of this popularity that you need to know the workings of the Google search engine. Without knowledge of it you'll be ranked lower than all other sites that are only slightly familiar with the Google algorithm and hence could lose lots of potential customers.

Google ranking algorithm

Let's now continue onto the main part of this Google rankings report by indulging ourselves in the Google ranking algorithm. Well there are two main parts to the algorithm Google uses, the first is its text matching system whereby Google tries to find pages relevant to what the searcher has entered in the search box. The second and equally important part of the algorithm is of course the Google patented Pagerank™ system.

I'll first go through how to make your pages relevant by discussing the text matching part of the algorithm.

Google gives a lot of "weight" to the title tag when searching for keywords. It is therefore vital to make sure your most important keywords or keyphrases appear within this tag. It seems to work best if you've other words in your title tag too after your keywords, but try to remain under 35-40 characters.

I imagine many of you know this already but Google does not use meta tags such as the keywords meta tag or the description meta tag. This is because the text within these tags can't be seen by visitors to a website. Therefore Google feels these tags will be abused by webmasters placing lots of unrelated words in them in ##### to get more visitors.

This lack of support for meta tags means that Google creates your description from the first few lines of text on your page. This in turn means that you've to have your keywords and phrases right at the top of your webpage, if Google finds them your page becomes more relevant, if however it doesn't find them the rest of your page has to work harder to become relevant. To see an example of what I mean scroll back to the top of this page and you'll notice keyword rich wording similar to:

Google submitting tips, ranking high at google.com, Google ranking tips, pagerank algorithm, Google algorithm guide.


The above text includes keywords and keyphrases related to the theme of this page. Now when people search for any of those keywords or keyphrases this page is much more likely to be near the top of the results than a page that doesn't imply this technique.

Google considers keyword density in the body of a page for determining relevancy too, so make sure your keywords and phrases appear a couple of times throughout the whole page. Don't go overboard though, a density of 6-10% seems to work best.

Google has recently been noticed to give a substantial amount of "weight" to words appearing between the various header tags. These are tags designed to help you split up sections of your page, so this approach by Google seems to make sense. The header tags go from
the smallest to

the biggest, the bigger the heading tag the more relevent your page will become for the words within it. It is for this reason that you should always try to have your most important words within these tags as often as possible throughout your page.

Other advice about making your page relevant would be to make as many keywords appear within bold tags as you can. In the past Google has been known to index text in alt image tags, whether they still do or not I don't know but it couldn't hurt to include keywords in these tags anyway.

One final tip on page relevancy is the point on having your keywords and phrases in links which point to your site. It's a good idea to have the linking text contain your keywords as Google even says itself in its description of its Pagerank technology that it analyzes pages that links come from.

How much keyword laden links matter is anyone's guess. I have however noticed a lot of sites which give the HTML code to visitors who want to exchange links do include keywords in the actual linking area. You should do this too on your links page, say something like "if you want to link to this site, please use the following code". The code would of course have your most important words in the actual link text and your less important words in the accompanying description of your site.

Who Links to Me ? - Add Technorati Cosmos in your Blog

Want your site visitors to know which other websites are linking to your blog ? Just place a Technorati cosmos iframe in your blog sidebar.

The embedding process is very simple. Here we'll actually show you two Technorati hacks that allow you to add the WhoLinksToMe box in your blog.

Technorati Cosmos Using Technorati Mini

Use Technorati Mini when you want the Technorati Link data to refresh automatically at frequent intervals (every sixty seconds).
<iframe src="http://technorati.com/mini/index.html?s=abc.com"
scrolling="no" frameborder="no" height="470px" width="310px">
</iframe>
Technorati Cosmos using Bumpbox

Bumpbox is a third party service that uses the Technorati API to fetch the link data from Technorati database. Here the data refreshes only after an hour but the embedded box is free of any sponsored links that you get with Technorati Mini. You will also see a short context of the linking blog post by appeneding &desc=true to the blog url.
<iframe scrolling="no" frameborder="no" width="310px" src=
"http://bumpbox.com/tools/cosmosbox/cosmosbox.php?url=abc.com">
</iframe>
Note: Replace abc.com with your own blog URL.

Email Inbox Can Reveal The Kind of Person You Are

How many unread messages do you have in the Inbox ? Is your Spam and Trash folder empty ? Do you respond to incoming mail immediately on arrival (including spam) ? Answers to these simple questions may reveal a lot about your personality and upbringing.

According to new research, the makeup and tidiness of your inbox is a reflection of your habits, your mental health and even the way Mom and Dad raised you. The disorder in our inboxes mirrors the disorder in our homes, marriages and checkbooks.

"If you keep your inbox full rather than empty, it may mean you keep your life cluttered in other ways," says psychologist Dave Greenfield. On the other hand, if you obsessively clean your inbox every 10 minutes, you may be so quick to move on that you miss opportunities and ignore nuances. Or your compulsion for order may be sapping your energy from other endeavors, such as your family.

The story also mentions Merlin Mann of 43folders.com who uses a few dozen "templates" to answer email -- prewritten form letters in which he inserts a person's name or a personalized comment. He also empties his inbox hourly. "You have to treat your inbox like you treat your mailbox at home," he says. "You wouldn't store your bills inside your mailbox. And leaving spam in your inbox is like leaving garbage in your kitchen."

Read: What your inbox says about you, Merlin Mann

Free Windows Vista Upgrade Coupons for Windows XP Users

Windows XP Users will be eligible for a free upgrade to Windows Vista if they purchase a Vista-enabled PC starting October till the time Vista formally hits the store shelves.

Microsoft has teamed up with PC vendors to offer free Vista Upgrade coupons to PC buyers worldwide to encourage them to buy a Vista-capable PC as early as possible. With the coupon offer to kick off in October, prospective buyers who have planned to purchase a Vista-enabled PC in the first quarter of 2007 when the new OS is launched, will be encouraged to take up a Vista-capable PC in advance.

Related: Buy a Windows XP Computer or Wait for Windows Vista ?

Source: Microsoft To Offer Free Vista Upgrade

How Cyworld could trump MySpace

The most serious competition to MySpace may come from another country.

Already, it’s been noted that MySpace will likely face the problems of fleeting fidelity that have typically befallen social sites dominated by youths. But it may confront an even more formidable challenge based on the habits and sensibilities of an entirely different culture from Cyworld, the wildly popular social network in South Korea, which is opening in the United States.

The ubiquity of Cyworld in South Korea makes MySpace look like a fringe hobby. More than 90 percent of South Koreans between 20 and 29 are estimated to have pages on the network, and about 80 percent all citizens in that age bracket use the site daily, members and non-members alike.

Some of the factors in Cyworld’s success are specific to its native country: Members can join only with their national ID numbers, a requirement that helps limit predators but would likely raise privacy issues in the United States. In addition, South Korea’s unprecedented broadband initiatives have undoubtedly contributed heavily to the site’s massive growth.

At the same time, Cyworld has shown how a social network can become a natural extension of everyday life, regardless of geographic boundaries. People often keep hourly logs of their activities, posting pictures from their camera phones and using real-time avatars to show what room of the house they’re in at any given time.

So what factors would result in Cyworld overtaking MySpace? Maybe none. But the real test will be whether Cyworld can grow into the first truly international social network.

That status could conceivably play into the political altruism that defines youths of all countries and cultures–something that would prove far more durable than just ranking high on the cool factor in a single nation.

♥.Sữa chua Media.....

9down.com

Digital Inspiration